
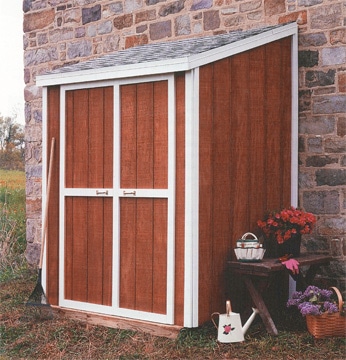
A lean-to shed uses a single-slope roof to create useful storage in a narrow footprint. It can stand independently near a house or be structurally attached to an existing building—but those are different projects. Attachment changes the permit, load, flashing and moisture details, so decide which approach you are building before choosing a plan.
Attached or Freestanding?
A freestanding lean-to placed near the house usually avoids cutting into the home’s wall and roof assemblies. It still needs code-compliant setbacks, a foundation, anchoring and enough clearance for drainage and maintenance. An attached lean-to transfers loads to the existing building and creates a roof-to-wall joint that must be designed and flashed correctly.
Do not assume the house wall can carry a ledger or new rafters. Siding, brick veneer, trim and sheathing are not automatically structural attachment points. Before fastening anything to the home, confirm the framing, foundation relationship, roof loads, wind exposure, utilities, fire-separation rules and permit requirements with the local building department or a qualified designer.
Plan the Site and Finished Size
Measure the equipment that will enter the shed—not just the open patch of ground. Allow for door swing, shelves, handles, mower decks, bins and a clear route to the largest item. Check overhead eaves, windows, vents, meters, hose bibs, service panels, heat-pump clearances and property-line setbacks.
- Locate buried utilities before excavation.
- Keep soil and paving sloped away from both the shed and the house.
- Leave inspection and maintenance access around a freestanding structure.
- Plan where roof water will discharge before setting the floor height.
- Choose door placement around the path used in wet or snowy weather.
Match the Foundation to the Site
The correct base depends on soil, frost depth, drainage, shed size, structural loads and local rules. A slab, frost-protected footing, pier system or properly prepared gravel-supported floor can each be appropriate in the right conditions. A patio is not automatically an adequate foundation, and a wood floor should not sit directly on soil.
Establish a level, stable bearing surface and keep untreated framing away from ground contact. Coordinate the base with the wall layout and the anchoring method so uplift and lateral forces have a continuous path into the ground. Start with the shed foundation guide, the shed floor guide and our anchoring overview.
Frame the Floor and Walls as One System
Use a plan sized for local wind and snow conditions. Floor joists, beams, studs, headers, sheathing, connections and anchors must work together; changing a span or removing a wall section for a wide door can change the required structure. Pressure-treated lumber is commonly specified where framing is exposed to moisture or close to masonry or soil, but use the treatment class required for the actual exposure and compatible corrosion-resistant fasteners.
Frame openings from the start. A wide double door needs a suitable header and enough braced wall on each side. Windows can improve daylight, but they remove wall area and may increase security, water-management and ventilation details. Review the related guides to shed wall framing, shed doors and shed windows.
Design the Single-Slope Roof Carefully
A lean-to roof may look simple, but its pitch, span, rafter size, sheathing, underlayment and roofing must be compatible. The roof covering manufacturer sets the minimum slope and underlayment details; do not flatten a plan below those limits. Size the structure for local snow and wind loads, and provide connectors that carry uplift from roof to wall and foundation.
Direct runoff away from doors, paths, foundations and neighboring property. If the high side faces the house, avoid sending water toward the wall or trapping debris in a narrow gap. Gutters and downspouts may be necessary even on a small roof. See the shed roof construction guide, roofing-material guide and shed guttering guide.
Flash an Attached Roof-to-Wall Joint
Sealant alone is not a durable roof-to-wall detail. An attached lean-to generally needs corrosion-resistant flashing integrated with the roofing, wall water-resistive barrier and cladding so each upper layer laps over the layer below. Depending on the location, the assembly may require step flashing, headwall flashing, counterflashing and a kick-out at the lower end.
The U.S. Department of Energy’s Building Science Education site explains that step flashing protects roof-wall intersections from water intrusion and describes integrating it with the wall drainage plane. Its companion kick-out flashing guidance addresses the vulnerable lower end of that intersection. Have the detail reviewed when existing cladding, masonry or unusual roof geometry makes integration uncertain.
Control Moisture and Ventilate the Shed
A roof and siding keep bulk water out; ventilation and drainage help the assembly dry. Provide clearances at the base, flash windows and doors, and use a cladding/water-resistive-barrier system suitable for the site. If the shed will be insulated or conditioned, decide on the complete air, vapor and thermal control strategy before closing the walls and roof.
Do not block required house vents with an attached structure. Fuel-burning appliances, hazardous-material storage and occupied uses can introduce additional ventilation and fire-code requirements. Our shed ventilation guide covers the planning basics.
Build in a Safe Sequence
- Confirm permits, setbacks, utilities and the attached-or-freestanding decision.
- Prepare drainage and the foundation; install the specified anchors.
- Frame and square the floor where the design uses one.
- Assemble, brace and sheath the walls; verify openings before raising them.
- Install rafters, roof sheathing, underlayment and the specified roof covering.
- Complete wall flashing, cladding, trim, doors, windows and roof drainage.
- Inspect anchors, flashing, clearances and operation before loading the shed.
Roof work presents serious fall hazards. Use the correct access and fall-protection equipment for the work and conditions. OSHA’s ladder-safety guidance covers setup and use, while its residential fall-protection guidance discusses roof-framing and sheathing operations. Hire a qualified contractor when you cannot perform the work safely.
Common Lean-To Shed Mistakes
- Calling a shed “freestanding” while rigidly fastening it to the house.
- Attaching a ledger through siding without confirming structural framing.
- Relying on caulk instead of integrated roof-to-wall flashing.
- Using a roof slope below the covering manufacturer’s minimum.
- Sending concentrated runoff toward the house foundation or walkway.
- Omitting bracing because the building is narrow.
- Changing door width, rafter span or wall height without checking the design.
- Blocking house vents, utility equipment or maintenance access.
Choosing a Lean-To Plan
A good plan should show dimensions, foundation assumptions, floor and wall framing, headers, roof pitch, rafter connections, bracing, sheathing and a material list. It should also state what must be adapted for local loads and whether it is intended to be attached or freestanding.
For a larger plan library to compare, Ryan’s Shed Plans is a paid affiliate recommendation. Verify every selected plan against your site, local code and manufacturer instructions before purchasing materials.