How do you build the best gravel shed base?
Building a gravel shed base is not very difficult, but it has to be done right. You need to find the right spot for your shed and the right plans. Next, plan how the shed will be situated and prepare the ground. Frame the foundation and make it square. Place the proper gravel in the base and make sure the base is compacted. If you don’t prepare the gravel shed base properly, then the entire project could be ruined.
Start With The Right Shed Plans

Your stuff is piling up and you need storage space. You know you need a shed but you are not sure what kind of shed you need. If you have a lot of storage needs, then you will need a bigger shed such as a gable shed. However, if you have a small amount of storage needs, then you may be able to build a small lean to shed. Do the proper assessment of your storage needs and then pick the right shed plan.
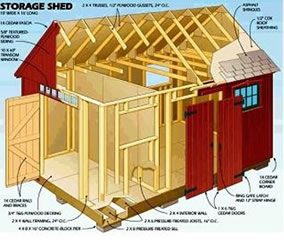
There are lots of options for a shed plan and I think the most common shed is a medium-sized gable shed. However, you need to look at multiple plans to find the right shed for your desires. Check out our shed plans to evaluate the many options available. Once you have the plans and you are going to build your shed make sure you get the proper permits. You can check here for permit questions.
Pick The Right Spot For Your Gravel Shed Base
You have done your homework and you have picked the right shed for your needs. You have plans and the materials to build the shed you want. Next, look at your available land and find the right spot for your shed. You do not want the shed to be too far away from the house, because you may not want to make the long walk to the shed. Furthermore, you may not want the shed too close to the house if it is going to be noisy. For instance, if your shed is a man cave, then it may be too noisy to be next to the home.
I would recommend that you find a spot for your shed that is somewhat level but sloping. The right spot should be on a gentle slope for proper drainage. Do not build it in a floodplain or too close to running water such as a creek. That would allow you to prevent flooding in the future. In addition, make sure that the ground is of good soil. The soil needs to be firm and not soft. You do not want soil that is too soft, because then you may have structural issues due to the shed shifting. Once you have the desired location it will be time to prepare the ground.
When considering the best base for placing a shed, it is important to assess the specific requirements of the shed and the intended use. Different types of sheds require varying levels of support from their bases. A lightweight shed may be suitable for placement directly on the ground, especially if it is a temporary or smaller structure. On the other hand, a medium-duty shed may benefit from a stable gravel pad to ensure its stability and longevity. Furthermore, a heavy-duty shed, such as one used for more significant projects or long-term storage, typically requires a more robust base, such as a concrete pad or a complete foundation to properly support the structure and its contents. By evaluating the weight, size, and intended use of the shed, you can determine the most appropriate base to ensure its durability and functionality over time.
Prepare The Ground For Your Gravel Shed Base
Ground preparation can be a very difficult task depending on the spot you picked for your shed. Rocky land will make it more difficult to prepare as the rocks will have to be removed. Land that is an excessive slope will take a lot more removal of dirt to make the foundation level. This could also require a retaining wall. If you have a piece of land that is on a gentle slope then this will be easier to make level. I recommend you dig out the foundation to allow for a 4-6 inch gravel shed base.
The ground work is done and the gravel shed foundation area is level. The next step would be to tamp the ground with a manual or automatic tamper. I like to use a manual tamper by Ames, because it works very well and the shed is a small structure so you may not need a large automatic tamper. However, if you are building a large shed, then an automatic tamper would be a wise choice. We like the one by Dirty Hands, which you can find here.
Can you put the shed directly on the ground?
It is possible to place a shed directly on the ground, but it is generally not advised. When a shed is in direct contact with the soil, it prevents moisture from escaping, which can lead to issues such as rot and deterioration over time. It is important to consider using a solid and level foundation for better structural integrity and longevity of the shed.
Frame The Gravel Shed Base

Once the area for the Gravel shed base is level and tamped you will need to frame the foundation. Prior to framing the foundation make sure you place a 1000 gauge Polythene vapor barrier in the tamped area.
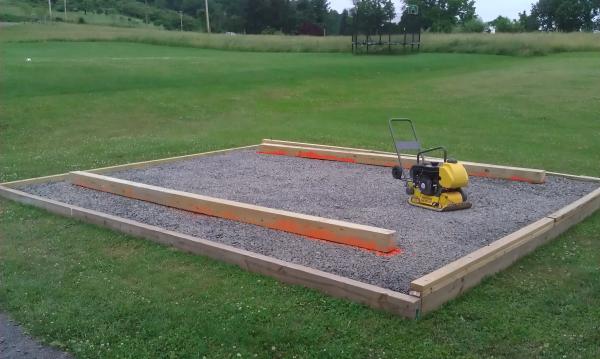
Take your shed plans and find the dimensions of the shed foundation. The next step will be to take some 2×4’s and make an outline of the shed foundation, like the picture below. It is recommended that you build the shed base about two feet extra in length and width from your shed plans. This allows for more drainage and a nice perimeter around the shed.
Square the frame properly by the method below.
- Length Measure and make sure the 2×4’s measure exactly.
- Width Measure and make sure the 2×4’s measure exactly.
- Measure diagonally from corner to corner and make sure that is exact also.
- Now you can screw together each 2 x 4 and place the proper pegs on the outside of the frame for stability. This will make sure it is a stable outline of your gravel shed base.
Pick The Correct Gravel For Your Shed Base
There are a lot of options when it comes to picking the right gravel. You don’t want it too large or too small. The gravel purpose is to allow drainage and provide support. The most recommended stone is 1/2″ to 3/4″ crushed stone. Do not use Pea Gravel. You can get the stone from many different providers. If the shed is small, then you may want to get bags of stone. However, if your shed is going to be large, then you may want the gravel delivered.
Place The Gravel And Prepare For The Shed
The process is coming along nicely. You have the permits and the right shed plans. The ground is properly level and the gravel shed base is dug to a 4-6 inch base. The foundation is framed with a 2 foot extra length and width frame. The frame is squared and the soil is tamped. The right gravel is bought and delivered into the framed area.
Lots of work done already and a little more to go. Now place some sand on the vapor barrier to protect it from the gravel. Then place the gravel in the foundation and tamp it again with your Ames manual tamper. If it is a large area to tamp then go with the the one by Dirty Hand Tools as we discussed above. The gravel is now tamped and level so move on to the building process.
Build The Shed On Your Gravel Shed Base
The permits are in place and the gravel shed base is properly prepared. Now it is time to build your shed. Below is a quick run down of your process. I have added links to other posts explaining each step of the process further.
You will begin with the floor structure. Make sure to choose the correct floor for your shed. Most sheds will be a wood floor, but there are exceptions depending on your shed needs.
The shed walls will go up next. Frame the walls according to the plans. A shed kit will have walls already assembled so adhere them to the foundation and floor.
Next will be the roof trusses and then the roof. Finish the roof with the right roofing material. Pick the right shed ceiling for the inside. Find the right shed siding for the outside. These choices will be determined on your shed design and needs.
Pick the right windows and doors for your shed. These can be decorative or basic depending on your needs. Furthermore, don’t forget about shed ventilation and if you are in a rainy area you may want to think about shed guttering also.
This is a post of shed building videos that we like.

The Ultimate Guide To Shed Building
Get Your Copy Plus Bonuses For 25% OFF! Coupon Code: shedbundle
The Best Gravel Shed Base - Conclusion
Building the right gravel shed base is not very difficult. However, it needs to be a stepwise process to make sure it is all done correctly. If the foundation is not done properly, then the entire shed could be in danger. If the foundation does not drain properly or if the foundation is not stable then the shed could shift and become unstable. Take your time and find the right shed plans. Make sure you evaluate lots of plans to find the right one. Then build the right foundation and shed that you need.
All the best,
JB


