Wood storage sheds are more than just simple outdoor structures; they are essential additions to any property, offering practical solutions for storage needs while enhancing the aesthetic appeal of the outdoor space. Whether you need to store gardening tools, outdoor equipment, or seasonal items, a well-built wood storage shed provides protection from the elements and helps keep your belongings organized and accessible.
In this comprehensive guide, we’ll walk you through the step-by-step process of how to build a wood storage shed from the ground up. From laying the foundation to selecting materials and constructing walls and roofing, you’ll learn everything you need to know to embark on this rewarding DIY project.
Laying The Foundation
The foundation is the backbone of any structure, providing stability and support. Begin by selecting a suitable location for your wood storage shed, ensuring it’s level and well-drained. Common foundation options include concrete slabs, concrete piers, or pressure-treated lumber skids. Follow local building codes and regulations when designing and constructing your shed foundation to ensure durability and longevity. The foundation options can vary depending on your storage shed needs. See all the options here.
Framing Your Wood Storage Shed
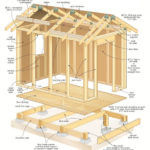
Once the foundation is in place, it’s time to start framing the structure. The framing serves as the skeleton of the shed, providing structural integrity and support for the walls and roof. Use pressure-treated lumber for the framing components to protect against rot and decay. Follow detailed plans and measurements to frame the walls, corners, and roof trusses accurately. Remember to leave openings for windows and doors as per your design preferences. Framing can be tricky, so read more here.
Roofing Options
The roof is a critical component of any shed, protecting the interior from rain, snow, and harsh sunlight. There are various roofing options to consider, including asphalt shingles, metal roofing, or corrugated panels. Choose a roofing material that complements the design of your shed and provides adequate weather protection. Install roof sheathing, underlayment, and flashing to ensure a watertight seal and prevent leaks. Explore more roofing options here.
How To Build a Wood Storage Shed


Wall Construction Made Easy
With the foundation and framing in place, it’s time to construct the walls of your wood storage shed. You can choose from different wall options, including traditional stud walls, board and batten siding, or tongue and groove panels. Consider factors such as insulation, durability, and aesthetics when selecting materials for your shed walls. Install siding or cladding according to manufacturer instructions, ensuring proper weatherproofing and sealing around windows and doors. There are many options you can explore here.
Door Options - Endless Possibilities
The door serves as the main entry point to your wood storage shed, providing access for storing and retrieving items. There are various door options to choose from, including single or double doors, sliding doors, or overhead garage doors. Select a door style that complements the overall design of your shed and meets your functional needs. Install door hardware, locks, and weather-stripping to ensure security and weather resistance. Check out more door options from our previous post here.
Summary
Building a wood storage shed is a rewarding DIY project that offers both practical benefits and aesthetic appeal. By following the step-by-step guidelines outlined in this guide, you can confidently tackle each stage of the construction process, from laying the foundation to installing the roof and finishing touches. Whether you’re a novice or experienced builder, building a wood storage shed allows you to customize a functional outdoor space that enhances your property’s value and utility for years to come. If you want to expand on this Masterclass and start building your dream shed today, then check out the plans below and build yours today. Happy Building!
All the best!
JB


