Introduction
Installing an outdoor shed might seem straightforward, but shed installation mistakes can lead to big problems—from leaky roofs to shifting foundations.
Many homeowners rush the process and end up with:
Doors that won’t close properly
Sheds that tilt or sink over time
Expensive repairs that could have been avoided
In this article, we’ll cover 7 shed installation mistakes to avoid and how to do the job right the first time.
💡 Pro Tip: If you haven’t already, check out our Complete Guide to Installing an Outdoor Shed for a step-by-step overview.
1. Failing to Level the Ground
One of the most common shed installation mistakes is installing your shed on uneven ground.
Why it’s a problem:
Doors and windows won’t align
Water can pool under one side
Structure becomes unstable over time
How to fix it:
Remove grass and debris
Use a long 2×4 and level to check the slope
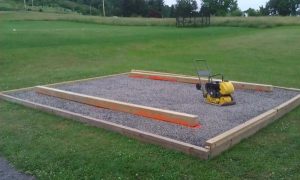
Add and compact gravel for a stable, drainable base
Read more about Ground Preparation here.
2. Ignoring Local Permits and Regulations
Many homeowners skip this step, but permits are often required for outdoor sheds.
Risks of skipping permits:
Fines from your local municipality
Forced shed removal if out of compliance
Trouble selling your home later
Solution:
Contact your local building department or HOA
Ask about setback requirements, size limits, and height restrictions
Obtain permits before starting construction
3. Skipping a Sturdy Shed Foundation
 A shed is only as good as its foundation. There is a reason that this is number 3 for shed installation mistakes, because your shed could crumble before your eyes.
Mistakes to avoid:
Placing the shed directly on soil
Using improper or uneven paver blocks
Not accounting for drainage
Best practice:
Build a gravel pad with treated lumber framing for most DIY sheds
Use a concrete slab for larger, permanent structures
👉 For a full breakdown, see Concrete vs. Gravel: Which Shed Foundation is Best?
4. Placing the Shed Too Close to Trees or Fences
Location is everything. Many DIYers place sheds too close to obstacles, leading to future headaches.
Why this is a problem:
Leaves and branches clog the roof and gutters
Limited airflow causes moisture buildup and rot
Difficult access for maintenance and moving equipment
Fix:
Leave 2–3 feet of clearance on all sides
Avoid low-lying, damp areas under trees
5. Forgetting About Drainage
Water is your shed’s biggest enemy.
Common drainage mistakes:
Installing a shed on flat or low ground
Not grading the soil away from the shed
Skipping a gravel base or French drain
Solution:
Ensure ground slopes away from the shed
Add gravel or a perimeter drain if your yard collects water
- More about Gutters and sheds here.
6. Not Following Manufacturer’s Instructions
Even if you’ve built sheds before, skipping the manual leads to errors.
Risks:
Wall panels don’t align properly
Roof leaks or weak trusses
Warranty becomes void if improperly installed
Pro Tip:
Lay out all parts and tools first
Follow the assembly order in the manual—especially for trusses and roof panels
- Check out Sheds To Build From Amazon.
7. Using the Wrong Anchors or Fasteners
 Many sheds fail during high winds because they weren’t properly anchored. This is one of the worst shed installation mistakes that can be avoided.
Mistakes to avoid:
Using standard screws instead of exterior-grade fasteners
Skipping anchors into concrete or soil
Ignoring local wind load recommendations
Best practice:
Use ground auger anchors for gravel/soil
Use concrete wedge anchors for slab foundations
Double-check local wind codes for your area
- Learn more about anchoring your shed.
Conclusion
Avoiding these 7 mistakes ensures your shed will be stable, weather-resistant, and long-lasting.
By preparing the site properly, following instructions, and weatherproofing your structure, you’ll avoid costly repairsand enjoy a shed that lasts for decades.
Next Step:
Read our Step-by-Step Guide to Installing an Outdoor Shed for a complete walkthrough from site prep to final inspection.


