
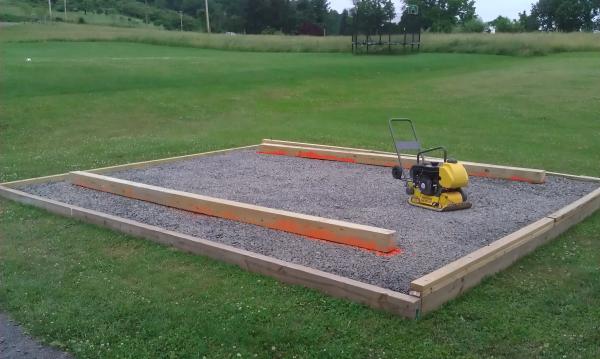
A compacted gravel shed base is a practical foundation for many small and medium backyard sheds. It drains well, supports a wood floor evenly, and can be adjusted more easily than a slab. Success depends on careful excavation, angular crushed stone, firm edge restraints, and compaction in layers.
If you are still choosing a base, compare concrete and gravel shed foundations or start with our shed foundation planning guide.
Start With The Right Shed Plans
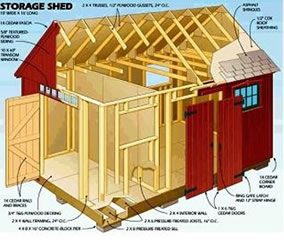
Confirm the shed footprint, floor system, door location, expected load, and manufacturer requirements before laying out the pad. The base should normally extend beyond the shed walls so roof runoff lands on stone instead of eroding the edge.
Check permits, setbacks, easements, underground utilities, frost conditions, and anchoring rules before work begins. Complete plans prevent a common mistake: building a level pad that is the wrong size for the floor frame. Ryan’s Shed Plans provides detailed designs and material lists. Affiliate disclosure: we may earn a commission from purchases through this link at no added cost to you.
Pick The Right Spot For Your Gravel Shed Base
Choose a well-drained location with access for construction and future maintenance. Observe the site after heavy rain and avoid depressions, drainage swales, flood-prone areas, and places where downspouts discharge. A gentle slope can often be excavated into the high side; steep terrain may require engineered retaining or pier work.
Remove vegetation and organic topsoil. Soft, expansive, or saturated soil may require deeper excavation, more aggregate, or professional advice. Do not place a wood shed directly on soil: ground contact traps moisture and allows uneven settlement.
Prepare The Ground For Your Gravel Shed Base
Mark a rectangle that matches the planned pad, then remove sod and organic topsoil. Excavate the high side rather than building the low side entirely with loose fill. The required depth varies with soil, load, climate, and local practice; the goal is to reach firm material and provide enough compacted aggregate for stable support.
Compact the exposed subgrade and correct soft spots before adding stone. Install a geotextile separation fabric where appropriate to keep soil from migrating into the aggregate. Fabric separates materials; it does not fix poor drainage or unstable soil.
Frame The Gravel Shed Base
Install durable edge restraints designed to hold compacted aggregate. Lay out the frame from the shed dimensions, allow a drainage margin around the building, and confirm the finished elevation will keep siding and doors clear of surrounding grade.
- Measure both length and width at multiple points.
- Compare diagonal measurements to confirm the rectangle is square.
- Set edge elevations with a laser, builder’s level, or tight string lines.
- Brace the perimeter so it cannot spread during compaction.
Do not rely on thin untreated boards as permanent restraints. Material and anchoring should suit the pad height, soil, and expected loads.
Pick The Correct Gravel For Your Shed Base
Use clean, angular crushed stone specified locally for compacted base work. Angular particles interlock under compaction; rounded pea gravel tends to shift and is a poor choice for a structural pad. Ask the quarry or landscape supplier for the material commonly used for shed pads in your area.
Stone size and gradation should match the installation method and local conditions. For a large pad, bulk delivery is usually more practical than bags. Calculate volume from the excavated dimensions and compacted depth, then allow for compaction and minor grade correction.
Place The Gravel And Prepare For The Shed
Place aggregate in manageable lifts instead of dumping the full depth at once. Spread each lift evenly, lightly condition it with water only when appropriate for the material, and compact it with equipment suited to the pad size. Work systematically across the entire area, especially near edges and corners.
After the final lift, check elevation, level, and flatness in several directions. Correct low spots with additional stone and recompact; do not leave loose gravel as a leveling layer. Confirm the finished pad is square and that water will drain away from the shed.
Build The Shed On Your Gravel Shed Base
Before building or accepting shed delivery, confirm the pad dimensions against the floor frame and verify all bearing areas are supported. Follow the manufacturer or plans for skids, floor framing, connectors, and anchors. A gravel pad supports the shed, but it does not replace wind anchoring.
Continue with the shed floor design guide and storage-shed anchoring guide. Keep surrounding soil, mulch, and vegetation below the pad and direct roof runoff away from the base.
The Best Gravel Shed Base - Conclusion
A reliable gravel shed base is built in a deliberate sequence: confirm the plans and local requirements, choose a draining site, remove unstable material, install appropriate separation fabric and edge restraints, place angular crushed stone in lifts, compact thoroughly, and verify level and square.
Gravel is not automatically the best foundation for every shed. Heavy equipment, unusual soil, steep slopes, or a slab-as-floor design may point toward concrete or engineered support. Review the complete shed foundation guide and the concrete shed foundation guide before committing to materials.
Inspect the pad after major storms and during routine shed maintenance. Address erosion, blocked drainage, or edge movement before it affects the floor and doors.